Crawl4AI Docker Setup provides a practical way to run Crawl4AI as a self-hosted HTTP service instead of installing and managing the crawler directly inside every Python project. Docker packages the server, browser environment, and required runtime dependencies into a container, making the same crawling service easier to reproduce across development machines and servers.
Crawl4AI Docker deployment changed significantly in the newer secure-by-default releases. Current 0.9.x behavior requires special attention to API authentication: the server binds to loopback when no CRAWL4AI_API_TOKEN is configured, while authenticated deployments require clients to send that token as a Bearer credential. This guide therefore uses the newer security model rather than repeating older Docker commands that may no longer expose a usable service from the host.
What Is Crawl4AI Docker?
Docker runs Crawl4AI inside an isolated container.
Instead of manually coordinating:
Python
Browser dependencies
Playwright
Crawl4AI
API server
Runtime configuration
the container provides a prepared runtime.
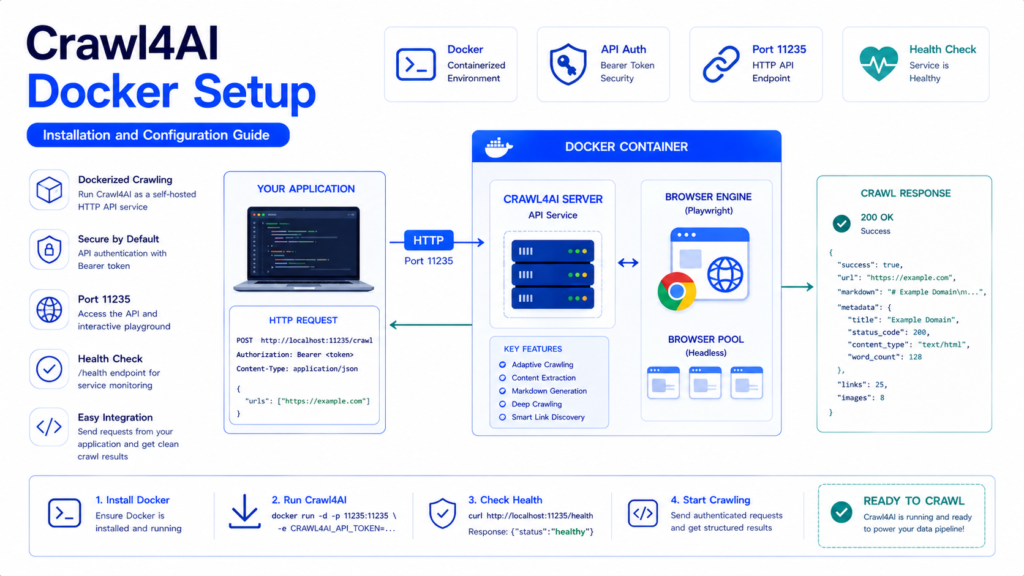
A typical architecture becomes:
Your Application
      ↓
HTTP Request
      ↓
Port 11235
      ↓
Crawl4AI Docker Container
      ↓
Browser Pool
      ↓
Target Website
      ↓
Crawl Result
Crawl4AI’s Docker implementation includes browser pooling, an interactive playground, HTTP endpoints, multi-architecture support, and integrations intended for external applications.
Docker is particularly useful when several applications need access to one crawling service or when Crawl4AI needs to run on a dedicated server.
Docker Setup vs Python Installation
Crawl4AI can also be installed directly with pip, but the two approaches solve different deployment needs.
| Python Installation | Docker Deployment |
|---|---|
| Runs inside your Python environment | Runs as a separate service |
| Direct Python API | HTTP/API access |
| Project manages dependencies | Container manages runtime |
| Convenient for local scripts | Useful for services and deployment |
| Python process controls crawler | Container lifecycle controls server |
Direct installation is usually simpler for a standalone Python application.
Docker becomes attractive when you want:
Application A ─┐
Application B ─┼─→ Crawl4AI Server
Application C ─┘
That separation also lets applications communicate with the crawler without sharing its complete Python environment.
Check Docker Before Installing Crawl4AI
Verify Docker first:
docker --versionYou can also check that the Docker engine responds:
docker infoFor Docker Compose:
docker compose versionA working Docker installation should be confirmed before troubleshooting Crawl4AI itself.
You should also ensure enough memory is available for browser workloads. Crawling is not equivalent to running a tiny command-line container because Chromium processes consume additional memory and shared-memory resources.
Understand the Current Authentication Requirement
This is the most important part of a modern Crawl4AI Docker setup.
Since Crawl4AI 0.9.0, the self-hosted Docker API is secure by default. Authentication is enabled by default, and without a configured API token, the server stays bound to loopback inside the container.
Create a strong token on Linux/macOS with:
openssl rand -hex 32For example, save it temporarily:
export CRAWL4AI_API_TOKEN="$(openssl rand -hex 32)"Do not use a weak example token in production.
The deployment relationship is:
CRAWL4AI_API_TOKEN configured
            ↓
Server can accept authenticated access
            ↓
Client sends:
Authorization: Bearer <token>
This authentication requirement is especially important because some older Crawl4AI Docker tutorials show an unauthenticated docker run command. That approach can be misleading with current 0.9.x behavior.
Pull the Crawl4AI Docker Image
Pull the current image:
docker pull unclecode/crawl4ai:latestDocker downloads the required image layers.
Afterward, verify that the image exists:
docker imagesYou should see an entry for:
unclecode/crawl4aiCrawl4AI publishes Docker images with multi-architecture support, including AMD64 and ARM64 support.
For production deployments, consider pinning a tested version rather than automatically depending on latest. This prevents an unexpected upgrade from changing server behavior.
Run Crawl4AI with Docker
A modern authenticated deployment can be started with:
docker run -d \
  -p 11235:11235 \
  --name crawl4ai \
  --shm-size=1g \
  -e CRAWL4AI_API_TOKEN="$CRAWL4AI_API_TOKEN" \
  unclecode/crawl4ai:latest
Important options are:
-dRuns the container in the background.
-p 11235:11235Maps host port 11235 to the container.
--name crawl4aiAssigns a convenient container name.
--shm-size=1gIncreases shared memory available to browser processes.
-e CRAWL4AI_API_TOKEN=...Passes the API credential into the server.
A recent Crawl4AI documentation issue specifically confirms the token requirement for externally reachable 0.9.x Docker deployments.
Check Whether the Container Is Running
Run:
docker psLook for the crawl4ai container.
For more details:
docker ps -aIf it stopped unexpectedly, inspect its logs:
docker logs crawl4aiFor live logs:
docker logs -f crawl4aiLogs are often the fastest way to distinguish a Crawl4AI configuration problem from a Docker networking or browser startup problem.
Verify the Health Endpoint
Once the server starts, test:
curl http://localhost:11235/healthCrawl4AI’s Docker examples use /health for deployment verification.
A successful health request confirms several things at once:
Container started
      ↓
Port mapping works
      ↓
HTTP server responds
However, a successful health check does not necessarily mean authenticated crawl endpoints will work. Current secure deployments require authorization for protected endpoints.
Open the Crawl4AI Playground
Crawl4AI provides an interactive playground at:
http://localhost:11235/playgroundThe playground is useful for testing requests and exploring server functionality before writing application code.
With authenticated deployments, enter your configured API token where the interface requests it.
A useful development flow is:
Start Container
      ↓
Check /health
      ↓
Open /playground
      ↓
Enter API Token
      ↓
Test Crawl
      ↓
Move Working Request into Application
This reduces debugging because you can establish that the server itself works before testing your application integration.
Send an Authenticated Crawl Request
Protected endpoints should receive:
Authorization: Bearer YOUR_TOKENA basic request can therefore follow this pattern:
curl -X POST \
  http://localhost:11235/crawl \
  -H "Authorization: Bearer $CRAWL4AI_API_TOKEN" \
  -H "Content-Type: application/json" \
  -d '{
    "urls": ["https://example.com"]
  }'
The important distinction is between the Docker service and the target website.
localhost:11235
        ↓
Crawl4AI API
        ↓
https://example.com
        ↓
Crawled result
Your application communicates with Crawl4AI; Crawl4AI then performs the web request and browser work.
Call Crawl4AI Docker from Python
An application can communicate with the Docker server using a normal HTTP client.
import os
import requests

token = os.environ["CRAWL4AI_API_TOKEN"]

response = requests.post(
    "http://localhost:11235/crawl",
    headers={
        "Authorization": f"Bearer {token}"
    },
    json={
        "urls": [
            "https://example.com"
        ]
    },
    timeout=60
)

response.raise_for_status()

data = response.json()

print(data)
Keeping the token in an environment variable avoids hard-coding a secret directly into source code.
Crawl4AI’s repository includes HTTP-based Docker examples for submitting crawl requests and handling returned results.
Configure LLM Provider Keys Separately
Basic crawling does not require you to add an external LLM provider.
LLM-powered functionality does.
Crawl4AI supports a .llm.env file for provider credentials and configuration.
A simplified file could look like:
OPENAI_API_KEY=your-key
GROQ_API_KEY=your-key
Never publish real keys.
Never commit .llm.env into a public repository.
Run the container with an environment file when appropriate:
docker run -d \
  -p 11235:11235 \
  --name crawl4ai \
  --shm-size=1g \
  --env-file .llm.env \
  unclecode/crawl4ai:latest
For a current authenticated deployment, the environment supplied to the container must also include CRAWL4AI_API_TOKEN.
Conceptually, keep the credentials separate:
Crawl4AI API Token
→ protects your Crawl4AI server

LLM Provider API Key
→ authenticates Crawl4AI with an LLM provider
They serve completely different purposes.
Set Up Crawl4AI with Docker Compose
Docker Compose is useful when configuration should be reproducible and maintained as files.
Clone the repository:
git clone https://github.com/unclecode/crawl4ai.git
cd crawl4ai
Crawl4AI’s self-hosting documentation recommends copying its example LLM environment file:
cp deploy/docker/.llm.env.example .llm.envThen edit .llm.env as required.
For current secure deployments, make sure the API token actually reaches the container.
For example:
CRAWL4AI_API_TOKEN=your-strong-random-tokenThen start the deployment:
docker compose up --build -dCheck services:
docker compose psInspect logs:
docker compose logs -f
A July 2026 documentation report notes that simply exporting CRAWL4AI_API_TOKEN in the shell may not pass it through the repository’s Compose configuration as users expect. Putting the value into the environment file used by the deployment is therefore important when working with affected 0.9.x configurations.
Understand Docker Port Mapping
The standard mapping:
-p 11235:11235means:
Host
localhost:11235
       ↓
Docker Port Mapping
       ↓
Container
11235
       ↓
Crawl4AI Server
Changing the host-side port is possible:
-p 8080:11235The application would then access:
http://localhost:8080while Crawl4AI continues using port 11235 inside its container.
This is useful when port 11235 is already occupied.
Stop and Restart Crawl4AI
Stop the running container:
docker stop crawl4aiStart it again:
docker start crawl4aiRestart it:
docker restart crawl4aiRemove it:
docker rm -f crawl4aiRemoving a container is different from removing its Docker image.
Check installed images with:
docker imagesThis distinction matters when troubleshooting because recreating a container does not necessarily redownload the image.
Update the Docker Image
Pulling a newer image does not magically replace an already running container.
A basic update process is:
docker pull unclecode/crawl4ai:latestThen recreate the container using the updated image and the same required configuration.
Before doing this in production, review Crawl4AI release notes.
Version 0.9.0 introduced major security changes specifically for the self-hosted Docker API while leaving normal in-process pip-library behavior unchanged.
That distinction makes version pinning valuable:
Test version
     ↓
Pin image
     ↓
Deploy
     ↓
Review release notes
     ↓
Test next version
     ↓
Upgrade deliberately
Docker Networking for Another Container
localhost has a special meaning inside containers.
Suppose:
Application Container
+
Crawl4AI Container
If the application calls:
http://localhost:11235it is asking for port 11235 inside the application container itself, not the Crawl4AI container.
With Docker Compose, services can communicate over their shared Docker network using the service name.
Conceptually:
Application Container
        ↓
http://crawl4ai:11235
        ↓
Crawl4AI Container
This is a common source of confusion when a request works from the host but fails from another container.
Secure a Production Deployment
Publishing:
-p 11235:11235can make the service reachable beyond the local machine depending on host networking and firewall configuration.
Production deployment should therefore be treated differently from local testing.
Crawl4AI 0.9.0 moved toward authentication and loopback binding by default specifically to harden its Docker API.
A safer architecture is:
Internet
   ↓
HTTPS
   ↓
Reverse Proxy
   ↓
Authentication / Network Controls
   ↓
Crawl4AI Docker
Crawl4AI’s security guidance recommends authentication, HTTPS through a reverse proxy, and restricting access to trusted networks where appropriate.
Do not expose an unrestricted crawler API publicly.
Understand Hooks Security
Older examples may show executable hooks supplied through API requests.
Modern Crawl4AI Docker releases are more restrictive.
Hooks have been disabled by default since the security changes introduced around v0.8.0, and enabling them requires:
CRAWL4AI_HOOKS_ENABLED=trueCrawl4AI recommends enabling hooks only when API users are trusted because the restriction was introduced as part of security hardening.
Therefore, do not enable hooks simply because an old tutorial tells you to.
Enable them only when the deployment genuinely needs them and the security implications are understood.
Troubleshoot “Connection Reset” or Unreachable Server
A confusing situation can look like:
docker ps
→ container healthy

curl localhost:11235
→ connection reset
With current Crawl4AI Docker versions, check whether CRAWL4AI_API_TOKEN was actually provided to the container.
This has been reported specifically for 0.9.x: without the token, the server can remain loopback-bound inside the container even though Docker reports the container itself as healthy.
Inspect the container:
docker logs crawl4aiThen recreate it with the required token if necessary.
Troubleshoot Port Already in Use
An error may occur if another application already owns port 11235.
Check the container list:
docker psEither stop the conflicting service or map Crawl4AI to another host port:
docker run -d \
  -p 11236:11235 \
  --name crawl4ai \
  --shm-size=1g \
  -e CRAWL4AI_API_TOKEN="$CRAWL4AI_API_TOKEN" \
  unclecode/crawl4ai:latest
Then access:
http://localhost:11236Only the host-side port changed.
Troubleshoot Browser Crashes
Browser-heavy crawling can fail when container resources are constrained.
Start by checking:
docker logs crawl4aiThen inspect available host memory and container limits.
The commonly used Crawl4AI Docker command includes:
--shm-size=1gbecause Chromium and similar browser workloads use shared memory.
If problems occur only under concurrent crawling, resource pressure becomes an especially likely cause.
Troubleshoot 401 or 403 Responses
A healthy server can still reject API calls.
For current authenticated deployments, verify the request contains:
Authorization: Bearer <token>and confirm that the token matches the server configuration.
Do not confuse:
/health workswith:
all API endpoints are unauthenticatedCrawl4AI 0.9.x explicitly distinguishes the health endpoint from protected server operations.
A 403 involving hooks can have a different cause: hooks are disabled unless explicitly enabled.
A Practical Deployment Checklist
A reliable setup should follow this order:
Install Docker
      ↓
Verify Docker Engine
      ↓
Create Strong API Token
      ↓
Pull Crawl4AI Image
      ↓
Run Container
      ↓
Check docker ps
      ↓
Inspect Logs
      ↓
Test /health
      ↓
Open Playground
      ↓
Authenticate
      ↓
Run Test Crawl
      ↓
Connect Application
      ↓
Add Production Security
Testing each layer separately prevents one error from being mistaken for another.
For example, application debugging should not begin until the container and health endpoint are already confirmed.
Crawl4AI Docker FAQ
Does Crawl4AI require Docker?
No. Crawl4AI can be installed directly as a Python package. Docker is an alternative deployment model.
What port does Crawl4AI Docker use?
The standard examples expose the server on port 11235.
Does Crawl4AI Docker require an API token?
Current 0.9.x self-hosted server behavior is secure by default. CRAWL4AI_API_TOKEN should be configured for an externally reachable authenticated deployment.
Does basic crawling require an LLM API key?
No. LLM provider credentials are relevant to features that actually use those providers, not ordinary browser crawling.
Can Crawl4AI Docker run on ARM64?
Yes. Crawl4AI’s Docker distribution provides multi-architecture support including AMD64 and ARM64.
Why does /health work but /crawl fail?
A health endpoint confirms service availability. Protected operations can additionally require valid authentication.
Should I use latest in production?
A pinned, tested image version is generally safer because Crawl4AI’s Docker API has undergone breaking security changes between releases.
Can multiple applications use one Crawl4AI container?
Yes. A central Dockerized service can receive requests from multiple authorized applications, subject to available resources and your deployment architecture.
Conclusion
Crawl4AI Docker Setup gives developers a clean way to separate crawling infrastructure from application code. A working deployment starts with Docker itself, pulls the Crawl4AI image, exposes the required port, provides adequate browser resources, verifies the health endpoint, and then connects applications through the HTTP API. Docker Compose can make the same configuration easier to reproduce across machines and environments.
Crawl4AI Docker Setup also needs to reflect the project’s current security model rather than older unauthenticated examples. A strong CRAWL4AI_API_TOKEN, authenticated API requests, protected environment files, deliberate version upgrades, and a reverse proxy with HTTPS for externally accessible production deployments provide a much stronger foundation for running Crawl4AI reliably.